2. What Is a PXF File and Why Do Embroiderers Use It?
A Professional Digitizing Format for Pulse and Tajima Software
A PXF file is a specialized embroidery digitizing format developed for Pulse powered programs, including Tajima DG16. Unlike simple image files such as JPGs or PNGs, a PXF contains the complete technical structure of an embroidery design. It gives the software a clear, editable blueprint that can later be exported into machine formats.
What a PXF File Stores Inside
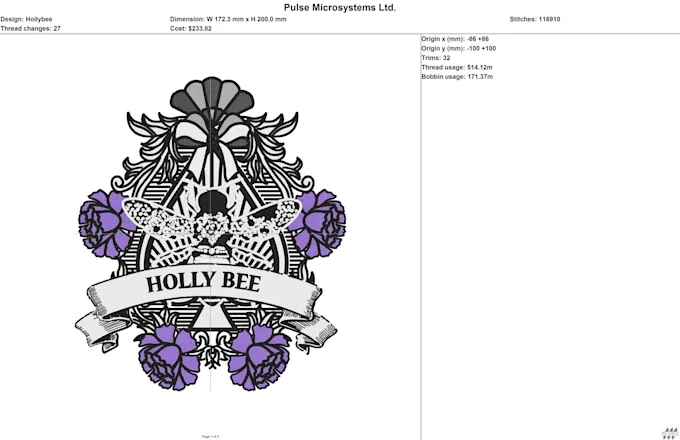
A PXF file captures every detail needed to stitch a design accurately. This includes stitch types like satin, tatami, and run stitches, as well as stitch angles, color layers, density settings, trims, and underlay options. Because it stores each section separately, it offers full editing flexibility. You can adjust any part of the design without recreating the entire file.
Why You Can’t Use Normal Images in Embroidery Machines
Embroidery machines cannot read JPGs or PNGs because these files contain pixels instead of stitch commands. A machine needs exact instructions that tell it where to start, where to end, and how each stitch should move. That is why digitizing is required before embroidery can begin.
Where PXF Fits in the Digitizing Workflow
The conversion process follows a clear path:
Image → PXF file → Machine readable file (DST, PES, EXP, JEF, etc.)
The PXF stage acts as the editable master file. Once the digitizing is complete, you can export it into whichever format your embroidery machine uses.
Benefits of Using PXF Files
Choosing the PXF format ensures precision, consistency, and cleaner embroidery output. It gives you full control over stitch direction, density, pull compensation, color sequencing, and other technical details that affect stitch quality. As a result, the final machine format runs more smoothly, reduces thread breaks, and produces sharper, more professional stitching.
3. Preparing an Image Before Conversion
Choose the Right Image Quality
Before you start converting anything into a PXF file, the first step is selecting the right image. A clear, high-resolution image with sharp outlines and good color separation will always digitize better. Artwork that is blurry, pixelated, or overly detailed creates unnecessary complications during digitizing and can result in messy stitches later.
Clean Up the Artwork for Better Results
Once you have chosen the image, clean it up to make it digitizing-friendly. Remove any unnecessary background elements, sharpen the edges, simplify the color areas, and adjust contrast so that shapes are easy to trace. This helps the digitizing software (and the digitizer) identify every section clearly. The cleaner the artwork, the cleaner the stitches will be.
When to Convert the Image into Vector
In some cases, converting your artwork to a vector format first can make the digitizing process smoother. Vector files have scalable, clean shapes that maintain their quality when resized. They are especially useful for logos, text, and geometric shapes. If your design contains many soft gradients or photographic elements, vector conversion may not be ideal, but for simple artwork, it provides excellent clarity.
Resize the Artwork to the Correct Embroidery Size
Your final stitch quality depends heavily on proper sizing. Resize the artwork to the intended embroidery size in inches or millimeters before you start digitizing. A design intended for a left chest will be digitized differently than a back logo or a hat design. Getting the correct size early ensures accurate stitch types, densities, and underlay choices later.
Recommended Image Formats
For best results, start with one of the following image formats:
-
PNG for clean, transparent backgrounds
-
JPEG for simple artwork with solid colors
-
TIFF for high-resolution or detailed artworks
These formats maintain clarity and are widely supported by all digitizing software.
Common Mistakes to Avoid
Avoid using low-resolution images, blurry scans, photos taken in poor lighting, or designs with heavy gradients and shadows. These issues make the digitizing process difficult, often forcing unnecessary guesswork. A clean, simple, high-quality image will always produce a more professional PXF file and cleaner embroidery results.
Four Ways to Convert an Image into a PXF File

4.1 Converting Through Professional Digitizing Software
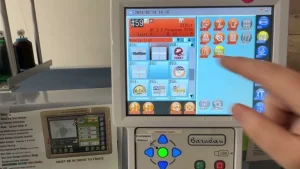
Professional digitizing programs such as Pulse Tajima DG16 or other compatible Pulse-powered editors are the primary tools used to create authentic PXF files. These software systems allow you to import an image and manually digitize every part of the design. The typical workflow looks like this: import the artwork, trace each section using the appropriate stitch types, refine the details, adjust densities and underlay, and finally export the file as a PXF.
The biggest advantage of using professional software is control. You can fine-tune every stitch, adjust angles, and make decisions that produce cleaner, smoother embroidery. This leads to highly professional and reliable results. The downside is the cost and complexity. These programs are expensive and require proper training, making them difficult for beginners or casual users.
4.2 Using Auto-Digitizing Features
Auto-digitizing is a feature that attempts to convert an image into stitches automatically with minimal user input. The software analyzes the artwork, assigns stitch types, estimates density, and produces a basic digitized file. For simple designs, this method is fast and beginner-friendly.
However, auto-digitizing comes with significant limitations. It often struggles with small text, thin outlines, gradients, or artwork with too many details. The results can be unpredictable and almost always require manual clean-up afterward. Auto-digitizing works best for basic shapes and simple logos. It should be avoided for professional work, complicated designs, or anything intended for production.
4.3 Trying Free or Online Converters
There are many online tools that claim to convert images directly into PXF files. While they may sound appealing, the reality is far different. Most online converters do not generate true PXF files. Instead, they produce low-quality stitch approximations with incorrect density, missing trims, and poorly mapped stitch paths.
In addition to quality concerns, there are risks such as privacy issues when uploading client artwork or company logos to unknown websites. These tools are only suitable for basic testing or experimentation, not for commercial or production-level embroidery. If quality matters, avoid relying on free converters.
4.4 Outsourcing to a Professional Digitizing Service
Outsourcing is one of the most reliable and time-efficient ways to convert an image into a proper PXF file. You simply send your artwork to a professional digitizing service, and they return a clean PXF file along with machine formats like DST, PES, or EXP.
Professional digitizers bring experience, precision, and real stitch knowledge. They understand how to balance densities, set correct underlay, adjust pull compensation, and ensure that the design runs smoothly on any embroidery machine. Look for services that offer unlimited edits, fast turnaround, and proven quality. This method is ideal for businesses with daily orders, tight deadlines, or anyone who prefers to skip the learning curve and get flawless results without purchasing expensive software.
5. Step-by-Step Guide: How to Convert an Image into a PXF File
Step 1: Open Your Professional Digitizing Software
Start by launching a digitizing program that supports PXF creation, such as Pulse Tajima DG16. Make sure your software is updated to the latest version to avoid bugs or compatibility issues.
Step 2: Import Your Cleaned Artwork
Upload the prepared image you plan to convert. A clean, high-quality artwork makes the digitizing process faster and more accurate. Position the image correctly on the workspace and lock it in place if needed.
Step 3: Digitize Each Section Manually
Begin tracing every part of the design using the correct stitch types. Use satin for borders and small areas, tatami for fills, and running stitches for fine details. At this stage, set basic parameters such as density and underlay for each section.
Step 4: Adjust Stitch Directions and Technical Settings
Fine-tune stitch directions so your design flows naturally and avoids unnecessary thread pulls. Set pull compensation to prevent distortions, add necessary trims, and adjust layering to ensure the embroidery runs smoothly in the proper order.
Step 5: Assign Thread Colors and Define Sequence Order
Choose the thread colors according to the artwork and embroidery requirements. Then, establish the stitch sequence so the machine knows which parts to run first, reducing unnecessary jumps and ensuring clean output.
Step 6: Save or Export the File as PXF
Once the design is digitized and polished, save it in the PXF format. This becomes your editable master file. Always keep a backup copy in case you need adjustments later.
Step 7: Export into Machine Formats if Required
From the PXF file, you can export into machine-specific formats such as DST, PES, EXP, JEF, or VP3. Choose the file type that matches your embroidery machine brand.
Step 8: Test with a Preview or Sample Sew-Out
Use your software’s stitch simulator to preview how the design will run. If possible, do an actual sew-out on a scrap piece of fabric. Testing helps catch issues like thread breaks, uneven density, or misaligned stitching before real production.
