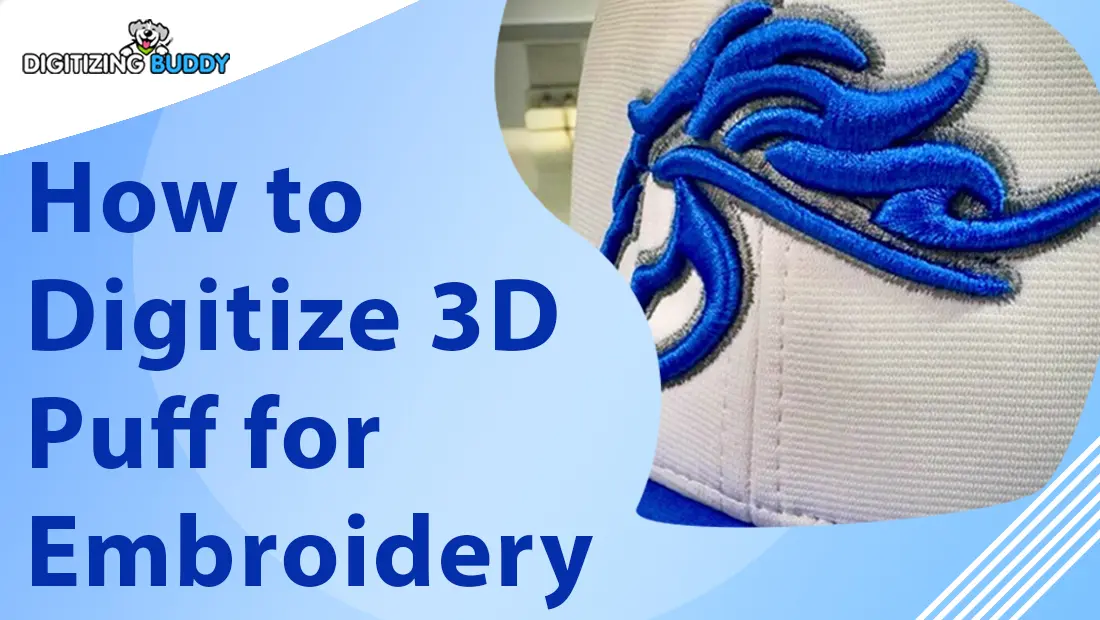
Ever noticed those bold and puffy logos on baseball caps that seem to pop right out of the fabric? That is the magic of 3D puff embroidery, a popular technique that gives your designs a raised and sculpted look by stitching over foam. Unlike regular flat embroidery, 3D puff adds volume and texture, making designs look bold, vibrant, and impossible to ignore.
It is a favorite in the world of sports logos, fashion branding, custom hats, and even pet portraits. From varsity jackets to snapbacks, 3D puff embroidery is everywhere, and it is not just for big factories anymore.
In this easy-to-follow guide, you will learn exactly how to digitize 3D puff designs for embroidery machines, even if you are just getting started. We will break down everything step by step, from picking the right design and setting up your file to choosing foam, testing, and stitching like a pro. So whether you are a hobbyist or a business owner, you are about to master the art of raised embroidery that truly stands out.
What is 3D Puff Embroidery?

3D puff embroidery is a technique that creates a raised effect by placing foam under satin stitches. As the machine stitches over the foam, the design becomes elevated, giving it a thick and bold appearance that stands out from the fabric. This effect adds depth and dimension, making your embroidery look more dynamic and professional.
It delivers results that regular flat embroidery cannot achieve. The puffed look is eye-catching and perfect for making designs pop, especially on items meant to grab attention.
This technique works best on structured materials like caps, denim jackets, hoodies, and other firm fabrics that can hold the puff shape. You will often see 3D puff used in sports team logos, brand names, bold monograms, and cartoon-style graphics. It is a favorite among apparel decorators who want to add texture and impact to their embroidery work.
Choosing the Right Design
Stick with Thick and Bold Elements
For 3D puff embroidery to work well, your design needs to be strong and simple. Block letters, bold shapes, and wide outlines are ideal. These elements give the foam enough space to expand under the satin stitches, helping the design rise off the fabric in a clean and solid way. The thicker the segment, the better the puff effect.
Avoid Tiny Details and Thin Lines

3D puff does not work well with fine lines, tiny text, or intricate details. These parts may look sharp in flat embroidery, but when stitched over foam, they often collapse, sink, or come out uneven. To keep your design clean and professional, it’s best to remove anything too small or delicate.
Simplify and Clean Up the Artwork
Before digitizing, take time to edit or redraw your design. Eliminate tight gaps, sharp corners, and unnecessary details. Smoother curves and simplified shapes are easier for the machine to handle and provide better results when foam is involved.
Visualize the Puff Effect

Always think in 3D. Imagine how each part of your design will look when raised. Ask yourself: Will this part puff up cleanly? Does it have enough space? If the answer is no, consider adjusting it before digitizing. This mindset helps you plan a design that looks impressive once stitched.
Preparing Your Digitizing File
Choose the Right Software
To create a successful 3D puff design, you will need professional digitizing software such as Wilcom, Chroma, or Hatch. These programs let you control every detail of the design—from stitch type and direction to density and underlay. Having this level of control is essential for working with foam.
Use Satin Stitch with Wider Columns
For puff areas, always use satin stitch, not fill stitch. Satin stitches are ideal because they lie neatly over the foam and create that smooth, raised surface. Make sure your satin columns are wide, between 3mm to 12mm. Anything thinner will not hold the foam well, and anything thicker can lead to unstable stitches.
Increase Density to Cover the Foam
To keep the foam fully hidden and avoid gaps, increase the stitch density in puff areas. This ensures that the stitches compress the foam properly and that no part of it shows through once the embroidery is done.
Avoid Fill Stitches and Add Capping
Disable any fill stitches in puff sections because they flatten the foam. Near the edges, use shorter stitch lengths to help cap and seal the foam tightly in place. This helps prevent the foam from poking out.
Use a Strong Underlay
Add a combination of edge run and zigzag underlay beneath the puff sections. These underlays stabilize the foam and give the top satin stitches something to grip, improving both the appearance and durability of the embroidery.
Proper Pathing and Stitch Sequence
Start from the Center and Move Outward
When digitizing a 3D puff design, it’s important to follow a center-out and bottom-up pathing strategy. This means you begin stitching from the center of the design and work your way outward, starting from the lower areas and moving upward. This method helps prevent fabric shifting, misalignment, and distortion during stitching, especially when foam is involved.
Digitize Flat Areas First
Always digitize non-puff elements first, such as flat embroidery sections or background details. Once those are completed, move on to the puff sections. Stitching the puff areas last ensures the raised parts stay clean, undisturbed, and do not get flattened by the machine going back and forth.
Plan the Thread Path Smartly
Be sure to plan clean entry and exit points for your thread trims. A well-organized stitch sequence prevents unnecessary thread jumps across puff areas, which can cause a tangled or messy look. Trim threads between letters or shapes cleanly for a professional finish.
Secure with Tie-Off Stitches
Because foam is thicker and springy, the thread can loosen if not properly locked. To avoid this, always add tie-off stitches at the beginning and end of each satin section. This keeps the design tight, neat, and secure even after multiple washes or wear.
Punching and Capping Techniques for Clean 3D Puff Embroidery

1. Punching with Perforations
Begin by adding needle perforations or short running stitches at the ends of your satin columns. These tiny cuts guide the foam to break cleanly when sutured, helping to prevent messy, uneven edges.
2. Capping Stitches to Seal Edges
Apply tight, short satin stitches, called capping stitches, along the design’s outer edges. This seals the foam securely, stopping it from peeking out and ensuring the embroidery stands the test of time.
3. Perfect for Curves and Open Shapes
These techniques are especially effective on curved or open shapes like “O,” “S,” and “C.” Punching and capping keep curves neat and prevent foam from lifting or fraying, giving your designs a professional finish.
Watch Video: How to Cap and Cut Foam in 3D Puff Embroidery
Foam Selection and Machine Setup for 3D Puff Embroidery
1. Choose the Right Foam

For clean, professional 3D puff embroidery, always use high-quality embroidery foam that’s 2–3mm thick. Avoid using cheap craft foam, as it can tear unevenly, melt under the needle, or ruin your final design. The foam color should closely match your thread color—this helps hide any small cutting errors or foam edges that might peek through.
2. Use the Correct Needle
Switch to a sharp 75/11 or 80/12 needle. Unlike ballpoint needles, sharp needles slice cleanly through the foam, making it easier to achieve smooth edges and avoid foam shredding or displacement.
3. Machine Settings Matter

Reduce your machine’s speed to around 500–650 stitches per minute (SPM). Slower stitching allows better accuracy, minimizes vibration, and prevents foam shifting. Also, slightly tighten your thread tension—this pulls the top thread deeper into the foam, giving that signature raised, rounded 3D look.
With the right materials and machine setup, your 3D puff embroidery will turn out sharp, durable, and eye-catching every time.