Circles on your screen look perfect, but on fabric they sometimes stitch out like eggs. Small text that looked sharp in the software can come out thicker, squeezed, or even unreadable. If you have seen that, you are not doing anything “wrong.” Fabric moves while the machine stitches, and that movement changes the final shape.
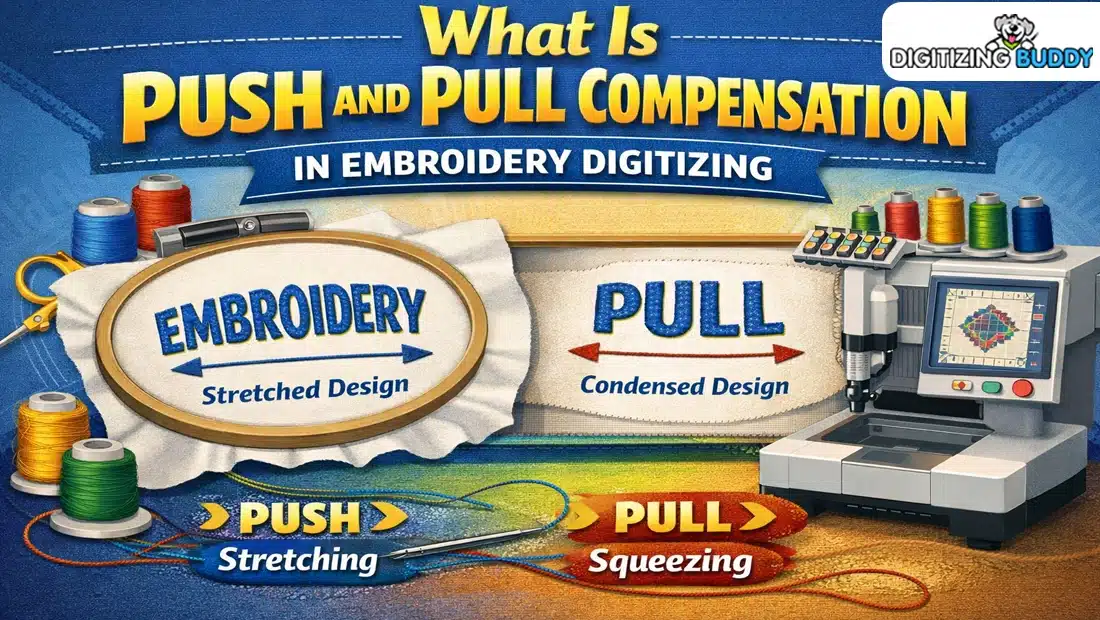
That is exactly why push and pull compensation exists. In simple words, it is the small “pre-adjustment” we make in the digitized file so the design stitches out the way it is supposed to in real life, not just on the screen.
In this blog, you will learn what push and pull really mean, why distortion happens, and the beginner fixes that actually help. And if this feels like too much trial-and-error, hiring a professional digitizing service is often the simpler and more cost-effective choice than learning through wasted garments and repeated stitch-outs.
- The Simple Meaning: What “Push” and “Pull” Actually Are
- Why Push and Pull Happens
- Signs Your Design Needs Compensation
- The Biggest Factors That Change Push and Pull (Beginner Checklist)
- Where Compensation Is Usually Applied (And What It Looks Like)
- Beginner Method: How to Set Push and Pull Without Guessing
- Common Beginner Mistakes (And the Quick Fix)
- When Outsourcing Becomes the Smart Move
- Conclusion
The Simple Meaning: What “Push” and “Pull” Actually Are
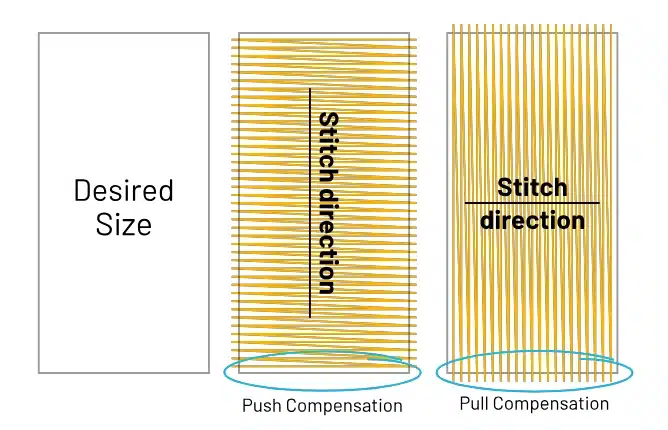
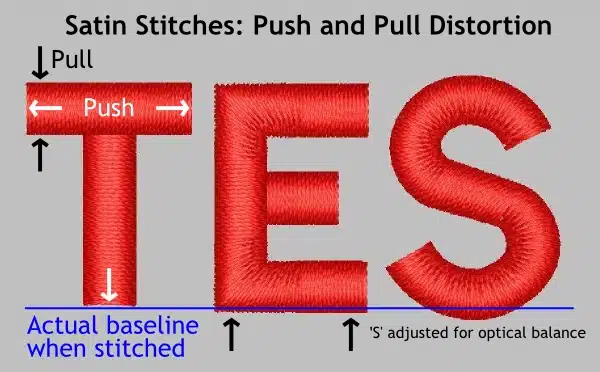
Push: Stitches Make the Design Look Wider
When the machine lays down dense stitches, the fabric can spread out a little. This is called push. It can make satin columns, borders, or filled areas look fatter, wider, or slightly puffy compared to what you saw on the screen.
Pull: Stitches Make the Design Look Smaller
As the thread tightens and the needle keeps punching, the fabric can get pulled inward. This is called pull. It can cause shrinkage, so shapes stitch out smaller, and it can create gaps, like when an outline does not fully cover the edge of a fill or small text looks thin and cramped.
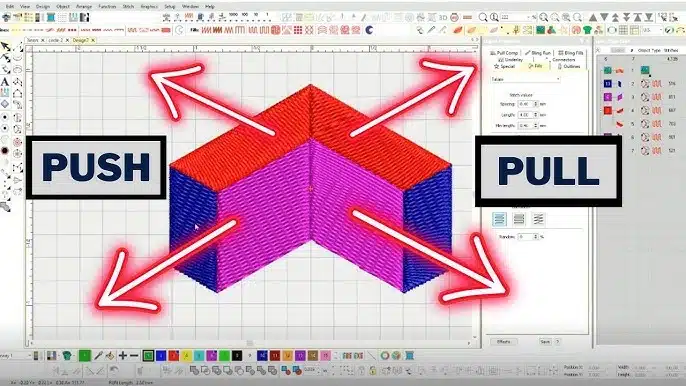
Think of Fabric Like a Tight Rubber Sheet
Imagine a rubber sheet held tight. If you press on it, it spreads outward (push). If you tug it, it narrows inward (pull). Fabric behaves in a similar way during embroidery because of tension, stitch direction, and density.
Key Point to Remember
This distortion is normal in embroidery. Push and pull compensation is the fix, it is the small adjustment made in digitizing so the design stitches out clean and correct.
Why Push and Pull Happens
1) Fabric Tension and Hooping Pressure
Embroidery fabric is held under tension in a hoop, and that tension affects the final shape. If you hoop too tight, the fabric can stretch and then relax after stitching, which changes the design size and edges. If you hoop too loose, the fabric can shift while stitching, causing wavy outlines and uneven shapes.
2) Stitch Direction and Density
Stitches naturally pull fabric in the direction they run. Long satin columns and heavy fills are common trouble areas because they apply more force. The denser the stitches, the more the fabric gets stressed, so distortion becomes more visible.
3) Thread Tension, Needle Penetration, and Friction
Thread tension is like a constant tiny tug on the fabric. If top or bobbin tension is off, it can increase pulling and shrinkage. The needle also punches the fabric repeatedly, and as thread passes through the material, friction builds up, especially in dense areas, which adds even more movement.
4) Underlay Changes Fabric Behavior
Underlay is the “base stitching” under your main stitches. It helps stabilize the fabric and improves coverage, but it also adds extra stitches, which can increase push or pull depending on the type and direction of the underlay.
Signs Your Design Needs Compensation

1) Shapes Do Not Stay True
If circles turn into ovals, or rounded edges look stretched in one direction, that is a strong sign the fabric is pulling and the design needs compensation.
2) Satin Columns Look Wrong
Satin columns are very sensitive to push and pull. If they stitch out too fat and bulky or too thin and weak, your settings are not matching how the fabric is behaving.
3) Small Text Becomes Unreadable
When small letters close up, lose clean gaps inside (like in “e” or “a”), or start breaking, it usually means the design is shrinking and needs compensation (and often a smarter approach to density and underlay).
4) Gaps Show Up Between Fill and Border
If you see little gaps where the fill meets an outline or border, the fill likely pulled in, and the border is not covering it properly.
5) Outline Does Not Match the Fill Edge
If the border looks “off” and no longer sits cleanly on the edge of the fill, it is another classic compensation problem.
Quick Tip
Always judge from the real stitch-out, not the screen preview. The fabric will always tell the truth.
The Biggest Factors That Change Push and Pull (Beginner Checklist)
Fabric Type (Stretchy vs Stable)
-
Stretchy knits (polos, T-shirts, fleece): move more during stitching, so distortion is more common.
-
Stable fabrics (twill, canvas, denim): hold shape better, so you usually need less compensation.
Stabilizer (Support Matters)
-
Cutaway: gives stronger, long-term support, usually best for knits and stretchy garments.
-
Tearaway: works well for stable fabrics, but if it is too weak, the fabric shifts and distortion increases.
-
Quick rule: weak stabilizer = more push–pull problems.
Hooping (Too Tight vs Too Loose)
-
Too tight: can stretch fabric and cause puckering once it relaxes after stitching.
-
Too loose: lets fabric slide, creating wavy outlines and misshaped elements.
-
Aim for “drum-tight” without overstretching.
Design Density (How Much Stitching You Pack In)
-
Heavy fills and thick satin: increase stress on fabric, so pulling and warping become more visible.
-
Lighter, well-planned density often stitches cleaner than “extra dense.”
Stitch Direction (The Hidden Distortion Driver)
-
Stitches tend to pull fabric along their direction.
-
Long stitch paths and one-direction fills can exaggerate stretching and shrinkage.
Underlay Choice (Foundation Changes Everything)
-
Edge run: helps define edges, especially for satin.
-
Zigzag: adds lift and support under satin columns.
-
Tatami underlay: stabilizes fills but can add extra pull depending on direction and density.
Where Compensation Is Usually Applied (And What It Looks Like)
Satin Columns
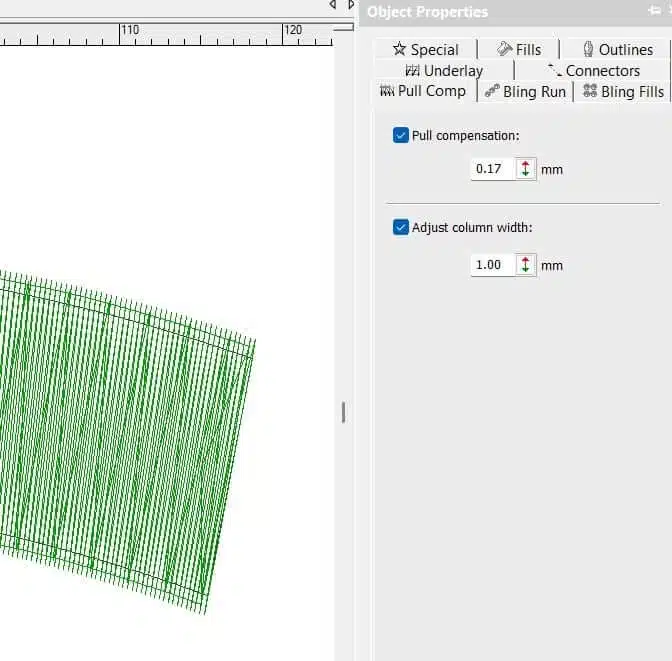
Satin columns are where beginners notice push–pull the fastest. Because satin stitches pull inward, digitizers often widen the column slightly so it stitches out at the correct thickness. Without this, columns can look thin, uneven, or “pinched,” especially on stretchy fabric.
Fills (Tatami)
Tatami fills can also shrink or shift, depending on density and stitch direction. A common fix is a small expansion of the fill area so the edges do not pull in too much. The goal is not to make the fill bigger for no reason, but to make the final stitched shape match the artwork.
Borders and Outlines
Borders usually need a clean “sit” on top of the fill. To do that, digitizers use an offset (a small placement adjustment) so the border covers the edge properly. This prevents ugly gaps where the fill ends and the outline begins.
Small Lettering
Small text needs a different approach. Instead of only making letters bigger, you often reduce density and slightly adjust widths so letters stay open and readable. Too much density is what makes tiny text close up.
What “Overlap” and “Offset” Mean
In plain language, overlap and offset are controlled “cover-ups.” You intentionally let one area stitch a little over another to hide gaps that would appear due to normal fabric movement.
Beginner Method: How to Set Push and Pull Without Guessing
If you are new, the fastest way to learn push–pull is to test in a simple, repeatable way instead of guessing on every logo.
Step 1: Pick One Test Fabric
Choose one fabric you commonly stitch on, like polo knit (stretchy) or a twill cap blank (stable). Stick to that one for testing so your results are consistent.
Step 2: Hoop Like You Mean It
Hoop the fabric correctly using the same stabilizer you will use in real jobs. Testing on different stabilizers than your actual order will give you misleading results.
Step 3: Build a Small Test File
Create a small test design that includes:
-
Three satin columns (different widths, like thin, medium, thick)
-
One circle and one square (easy shapes to spot distortion)
-
One line of small text (your most sensitive “warning sign”)
Step 4: Stitch and Inspect
After stitching, look closely and ask:
-
Where do I see gaps (fill not covered by border, letters opening)?
-
Where does it look too thick or bulky (satin spreading)?
-
Are the edges clean or wavy?
Step 5: Adjust Only One Thing at a Time
Make small changes, then stitch again:
-
Increase or decrease compensation slightly
-
If the problem is edge quality, try changing underlay first before messing with density too much
Step 6: Keep a “Settings Notebook”
Write down what worked for each fabric type, stabilizer, and design style. Over time, you build your own cheat sheet and stop starting from zero.
Common Beginner Mistakes (And the Quick Fix)
Using One Setting for Every Fabric
Mistake: Same compensation on polos, hoodies, caps, and twill.
Quick fix: Treat each fabric type differently. Stretchy fabric usually needs more correction than stable twill.
Overcompensating
Mistake: Expanding too much so borders overshoot, or text becomes bold and heavy.
Quick fix: Make small changes only, then test. A tiny adjustment can be enough.
Trying to Fix Everything With Density
Mistake: Increasing density to “force” coverage, which often makes pull and distortion worse.
Quick fix: Improve underlay first, then adjust density if needed.
Hooping Problems
Mistake: Hooping too tight (puckering) or too loose (shifting), then blaming the digitizing file.
Quick fix: Hoop firm and flat without stretching the garment, and match stabilizer to fabric.
Skipping a Real Test Stitch-Out
Mistake: Trusting the screen preview and running the final job.
Quick fix: Always do at least one test stitch on the same fabric and stabilizer before production.
When Outsourcing Becomes the Smart Move

The “Beginner Cost” Adds Up Fast
Learning push and pull compensation is valuable, but beginners often lose money while learning. The usual losses come from:
-
Failed stitch-outs that do not match the artwork
-
Wasted garments (especially polos, caps, and jackets)
-
Repeated edits that still need more fixing
-
Hours of testing that delays real work and customer delivery
What a Professional Digitizer Already Knows
A professional digitizer has tested habits and settings for common problems, such as:
-
Different fabric types (stretchy knits vs stable twill)
-
Keeping small text clean and readable
-
Creating clean borders that cover fills properly
-
Reducing distortion using correct underlay, density, and sequencing
The Practical Take
If you are stitching for a customer order or doing bulk production, outsourcing is often the cheaper and safer move. One production-ready file can cost less than one ruined garment plus the time spent re-testing and correcting the design.
Conclusion
Push and pull are not “mistakes” in embroidery. They are normal fabric movements caused by tension, stitching direction, density, and hooping. Push–pull compensation is simply the correction, the small adjustments made in digitizing so your final stitch-out matches the shape you designed.
If you are learning, keep it simple: test on the same fabric you plan to use, inspect the stitch-out closely, and change one thing at a time. That method alone will save you from confusion and random guessing.
And when you need clean results quickly, especially for paid orders or bulk runs, it often makes more sense to send your artwork to a professional digitizer. A production-ready file can save you time, prevent wasted garments, and reduce the back-and-forth edits that usually cost more than the digitizing itself.
Visit us at Digitizing Buddy for an instant Free Quote Now!