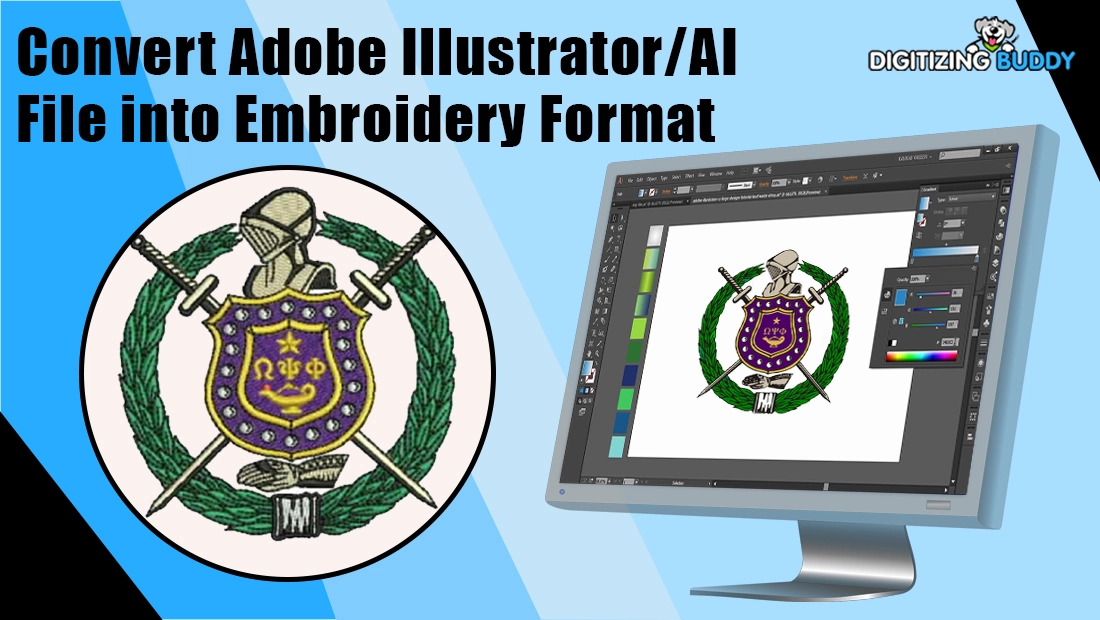
When it comes to creating designs, businesses, designers, and hobbyists often turn to Adobe Illustrator (AI) files as their starting point. Illustrator is widely loved because it allows you to work with vector graphics, which are clean, sharp, and can be scaled infinitely without losing quality. This makes AI files perfect for logos, branding, and detailed artwork.
However, embroidery machines do not understand vector artwork. They require stitch-based instructions in embroidery file formats such as DST, PES, or EXP. These formats tell the machine exactly where to place each stitch, how dense the stitching should be, and what sequence to follow. Without this conversion, your beautiful Illustrator design cannot be stitched out properly on fabric.
That is why converting Adobe Illustrator files into embroidery-ready formats is such an important step. It ensures accurate stitching, professional branding, and consistent production quality whether you are working on uniforms, caps, or promotional items. In this guide, we will walk you through the methods, tools, challenges, and professional options to convert AI files into embroidery formats.
Section 1: Understanding File Types

1.1 What is an Adobe Illustrator file?
An Adobe Illustrator file is a type of vector graphic. Vector graphics are made up of points, lines, and curves rather than pixels, which means they can be scaled up or down without ever losing quality. This makes them extremely popular for creating logos, branding materials, and digital designs where clarity and sharpness are important. Because of their flexibility, Adobe Illustrator files are often the first choice for designers who want to build artwork that will look professional across different mediums.
1.2 What is an embroidery file?
An embroidery file is very different from a vector file. Instead of storing curves and shapes, it contains stitch-based instructions that an embroidery machine can read. These instructions guide the machine on how to place each stitch, what type of stitch to use, the direction of stitching, the density of thread, and the sequence in which each section of the design should be stitched. Common embroidery formats include DST, PES, EXP, and EMB. Each format is created to work with specific brands or models of embroidery machines.
1.3 Why you cannot directly use Adobe Illustrator files in embroidery machines
The main reason Adobe Illustrator files cannot be used directly in embroidery machines is the difference in how they store information. Illustrator files rely on vector points to define shapes, while embroidery machines need stitch paths to know exactly where to sew. To bridge this gap, the artwork must be converted through a process called Embroidery digitizing. Digitizing translates the clean lines of a vector graphic into carefully planned stitches that an embroidery machine can follow to produce an accurate design on fabric.
Section 2: Preparing Your Adobe Illustrator File for Conversion

2.1 Simplify the design
Before converting an Adobe Illustrator file into an embroidery format, it is important to simplify the design. Embroidery machines do not work well with overly detailed graphics, so removing unnecessary elements is the first step. Simplify intricate shapes, avoid very thin lines, and expand any text so it becomes part of the artwork instead of remaining as editable font data. Flattening layers also helps ensure that the digitizing software interprets the design correctly and does not miss small hidden details.
2.2 Choose proper colors
Colors in Adobe Illustrator can be unlimited, but embroidery machines work with real thread. It is important to limit the color palette to match the thread colors you have available. Using too many shades can make the design look cluttered and cause longer production times. Gradients, shadows, and other digital effects do not translate into thread, so they should be removed or replaced with solid color areas. Keeping the design within a manageable set of colors will make the embroidery look sharper and easier to produce.
2.3 Adjust size and scale
The final step before conversion is to make sure the design is scaled correctly. Check that the artwork fits within the embroidery hoop size you plan to use. Also consider the minimum stitch length needed for clarity. Very small text or fine details may not stitch well and can end up unreadable on fabric. Adjusting the size and simplifying areas ensures the design is practical for embroidery while keeping its original look intact.
Section 3: Methods to Convert Adobe Illustrator to Embroidery Formats

3.1 Using Embroidery Digitizing Software
One of the most common methods of converting an Adobe Illustrator design into embroidery format is through specialized digitizing software. Popular programs include Wilcom Embroidery Studio, Hatch, Brother PE-Design, and Ricoma Chroma. These tools allow you to import Adobe Illustrator or EPS files directly and then convert them into machine-readable stitch formats such as DST, PES, or EXP. While the import process is often smooth, the real work happens afterward. You need to set stitch types, adjust the stitch angle, define underlay stitches, and control density. These manual adjustments are essential to prevent issues such as puckering, gaps, or uneven coverage. Using professional software gives you greater control but also requires time, practice, and technical knowledge.
3.2 Using Auto-Digitizing Tools
For those looking for a quicker solution, auto-digitizing tools are available. These programs can convert Adobe Illustrator designs into embroidery files in just a few clicks. Options include Ink/Stitch, which is a free plugin, and several online converters. Auto-digitizing works best with simple designs such as basic logos or text-based graphics. However, it struggles with detailed artwork or designs that require specific stitch effects. While the process is fast, the results are not always accurate and often require manual editing to achieve a professional look. It can be a good starting point but is rarely the final solution.
3.3 Outsourcing to Professionals
Another option is to hire a professional digitizing service. Companies like Digitizing Buddy specialize in converting Adobe Illustrator files into embroidery formats with a high level of precision. Professionals know how to plan stitch paths, manage density, and minimize thread breaks. They also test designs on different fabrics to ensure consistent results. Outsourcing is often cost-effective for businesses because it saves time and avoids errors that can lead to wasted material. It also guarantees that the final file is optimized for production, making it the preferred choice for those who need high-quality results without investing in expensive software or spending months learning digitizing skills.
4. Common Challenges in Conversion
When converting AI files into embroidery-ready formats, several challenges often come up that can affect the final stitched result. Understanding these issues beforehand helps save time, thread, and frustration.
4.1 Complex details in AI files
AI artwork frequently contains thin lines, small text, or gradient effects that look great on screen but are nearly impossible to stitch. Embroidery machines cannot capture extremely fine details or smooth color fades the same way a printer can. To solve this, digitizers simplify the artwork by thickening lines, enlarging text, or replacing gradients with layered stitches or solid fills. This ensures the design remains visually appealing while staying practical for embroidery.
4.2 Stitch density and fabric type
Another common challenge is adjusting stitch density to match the fabric. A dense design on light fabric may cause puckering, while a low-density design on heavy fabric may look incomplete. For example, designs meant for caps, T-shirts, or jackets often require different underlay and density settings. Proper adjustments help avoid thread breaks, ensure clean outlines, and maintain durability of the embroidery.
4.3 Trial and error
Even with the best planning, embroidery requires some trial and error. A test stitch-out is essential to see how the design behaves on real fabric. Often, digitizers refine elements like stitch direction, pull compensation, and color blending after the first test. This process of editing and testing ensures the final result is polished, professional, and production-ready.
5. Step-by-Step Guide

Converting an AI file into an embroidery-ready format may sound technical, but breaking it into simple steps makes the process easy to follow. Below is a practical workflow that most digitizers use to ensure smooth results.
Step 1: Open your Adobe Illustrator file in Illustrator.
Start with the original vector file and clean up any unnecessary details. Simplify shapes where needed to make them embroidery-friendly.
Step 2: Save or export as EPS or SVG.
Most embroidery digitizing programs support EPS and SVG, so exporting your artwork in one of these formats ensures smoother importing later.
Step 3: Import into embroidery digitizing software.
Open your digitizing software (like Wilcom, Hatch, or Ricoma Chroma) and load the file. This will convert your artwork into a base that can be assigned stitch types.
Step 4: Assign stitch types.
Decide whether each area should use satin, fill, or running stitches. For example, text often looks cleaner in satin, while larger areas work better with fill stitches.
Step 5: Set underlay and density.
Underlay stabilizes the design, while density controls how solid or open the stitching looks. Adjust these settings based on fabric type and desired effect.
Step 6: Save/export in machine format.
Once satisfied, save in the format your embroidery machine supports (DST, PES, EXP, JEF, etc.).
Step 7: Run a test stitch.
Always test your file on scrap fabric before production. This shows how the design interacts with real thread and fabric.
Step 8: Refine and finalize.
Make any adjustments for pull compensation, density, or stitch direction until the design runs smoothly and looks professional.
6. Why Choose Professional Digitizing Services
While DIY conversion is possible with software, professional digitizing services offer significant advantages that save both time and money.
Expertise in stitch pathing, density, and sequencing
Embroidery is more than just assigning stitches. Professionals know how to optimize stitch paths to reduce thread breaks, balance density for different fabrics, and sequence elements so the design runs smoothly without unnecessary trims or jumps.
Faster turnaround for businesses
If you run an embroidery shop, time is money. Spending hours learning software or fixing errors slows you down. Professional digitizers provide fast, ready-to-sew files so you can focus on production and customers instead of troubleshooting designs.
Cost comparison: software vs outsourcing
High-end digitizing software can cost thousands of dollars, not to mention the learning curve required to use it effectively. Outsourcing digitizing is often far more affordable—especially for small businesses or shops with limited design volume. You pay only when you need a design, without the upfront investment.
Digitizing Buddy advantage
At Digitizing Buddy, we specialize in AI file conversions starting at just $10. Our services include unlimited edits until you’re satisfied, 24/7 live chat support for quick assistance, and a money-back guarantee for peace of mind. Whether you need one design or hundreds, we provide professional-quality digitizing that keeps your embroidery business running smoothly.
Conclusion
AI files are great for design, but embroidery machines require stitch files to work properly. Converting from one to the other is not just a simple format change. It is a process called digitizing that involves planning stitch angles, density, and sequence to ensure the design looks clean on fabric.
If you are learning, trying DIY conversion can be helpful to understand the basics. But for business use, accuracy and efficiency are too important to risk. Poor digitizing can cause thread breaks, wasted time, and unhappy customers.
That is why choosing professionals is the smart option. Digitizing Buddy offers AI to embroidery file conversion starting at just $10. You also get unlimited edits, round-the-clock live chat, and a full money-back guarantee for peace of mind.
Order your AI to embroidery conversion today with Digitizing Buddy and get perfect, production-ready results every time.